

 The locked folder feature is only available on Android devices for now and you have to be on Android 6 or higherThe locked folder feature is only available on Android devices for now and you have to be on Android 6 or higher
Google Photos is an extremely helpful app to keep your photos and videos organised, particularly for Android users.
Google Photos is Android’s official gallery app and it allows users to view, edit, and backup photos and videos on Google Cloud. The app has also been recently updated to bring in a locked folder feature that will allow users to keep some content private.
Very often we share photos with friends and family and at times they also might be looking through the gallery where you might have content you don’t want others to see. This is where the locked folder will come in handy. A locked folder will allow you to store content and keep it away from the main gallery so as no one can access it.
So how does the locked folder in Google Photos work?
It’s pretty simple, actually. This is a folder where you can add photos and videos you want to keep private. Google Photos uses your device’s screen lock password to safeguard this folder and it could be your fingerprint or PIN.
The items in the locked folder will not show up on your photo grid, memories, or other albums and they will also not be accessible to other apps on your device even if they have access to photos and videos.
Just a note though, this locked feature on Google Photos is not available on iOS yet.
How to create this locked folder on Google Photos?
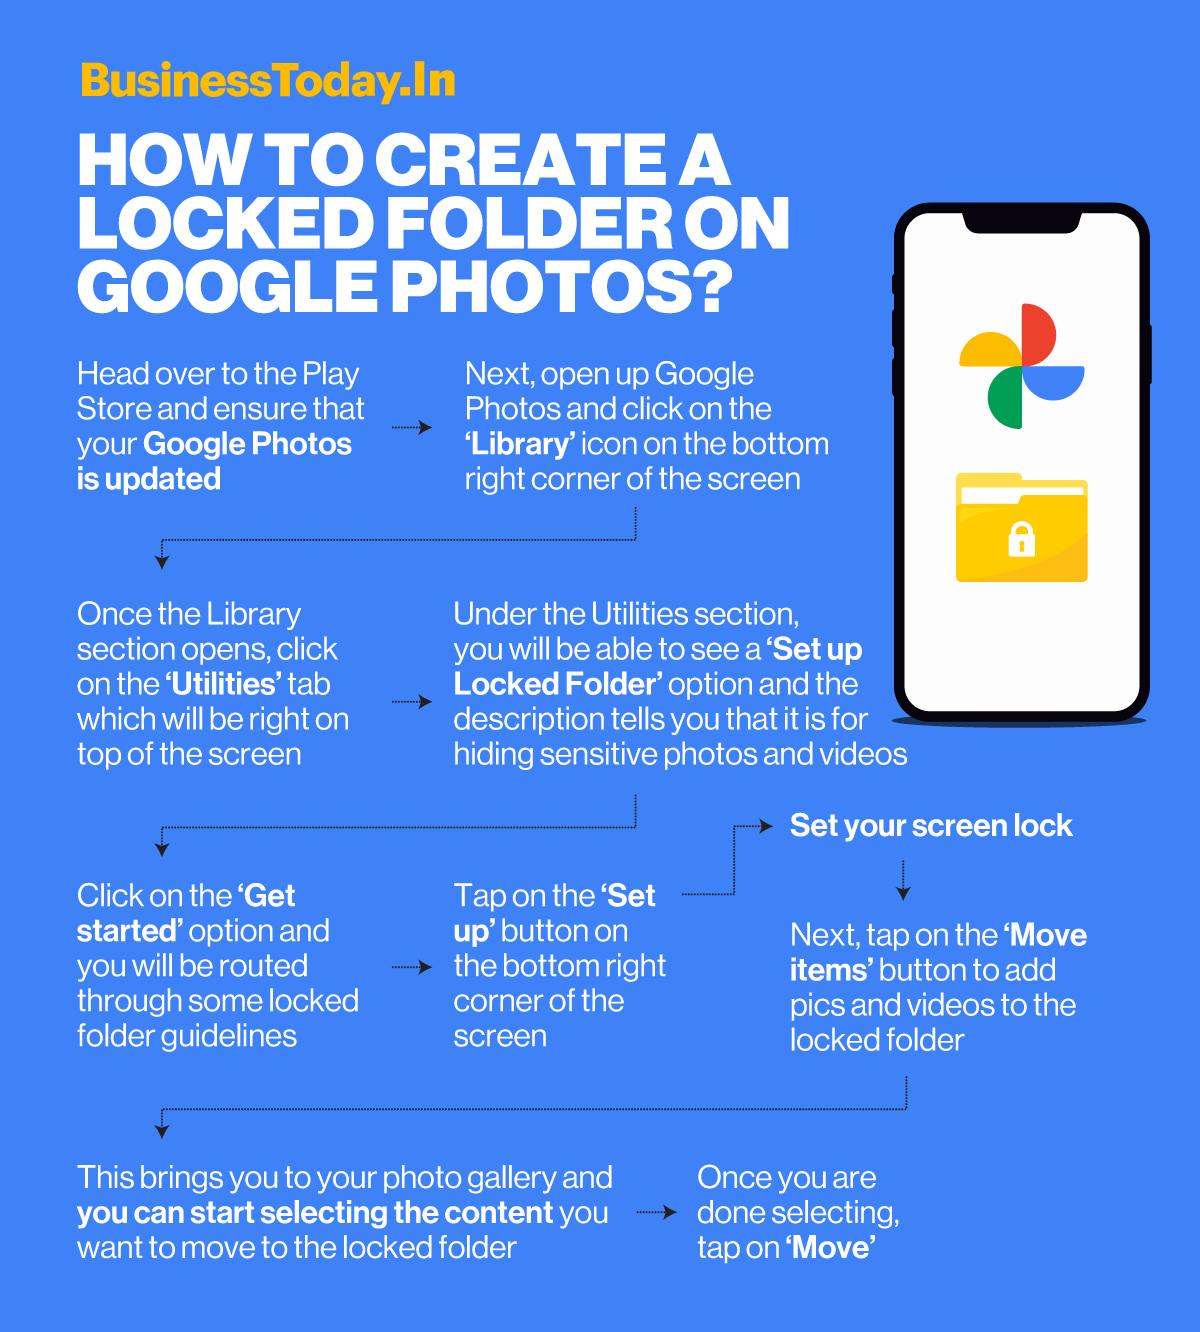
1. Head over to the Play Store and ensure that your Google Photos is updated.
2. Next, open up Google Photos and click on the ‘Library’ icon on the bottom right corner of the screen.
3. Once the Library section opens up, click on the ‘Utilities’ tab which will be right on top of the screen.
4. Under the Utilities section, you will be able to see a ‘Set up Locked Folder’ option and the description tells you that it is for hiding sensitive photos and videos.
5. Click on the ‘Get started’ option and you will be routed through some locked folder guidelines.
6. Tap on the ‘Set up’ button on the bottom right corner of the screen.
7. Set your screen lock.
8. Next, tap on the ‘Move items’ button to add pics and videos to the locked folder.
9. This brings you to your photo gallery and you can start selecting the content you want to move to the locked folder.
10. Once you are done selecting, tap on ‘Move’.
End note
The locked folder feature is only available on Android devices for now and you have to be on Android 6 or higher. Copies and edits of content in the locked folder will not automatically be moved to the locked folder, you have to add them manually.
If you are deleting Google Photos, these items will be deleted.
Also Read: How to free up storage space on Android smartphone
Also Read: Google starts rolling out new Real Tone filters on Google Photos for users
For Unparalleled coverage of India's Businesses and Economy – Subscribe to Business Today Magazine
 for that fiscal year.") Union Budget 2026: Just 0.08% of companies earned two-thirds of India Inc's profits before tax
Union Budget 2026: Just 0.08% of companies earned two-thirds of India Inc's profits before tax Joint statement on India-US trade deal in 2-3 days; $500 bn imports lined up over 5 years: Sources
 Budget 2026 maintained continuity and consistency, says DEA Secretary
 Rice exporters cheer as US cuts tariffs to 18%, boosting India’s export competitiveness
 'Left, right switches checked, found satisfactory': DGCA rejects fuel switch malfunction claims on Air India Boeing 787
 India–US Trade Deal Ignites Record Rally, Markets Add ₹20 Lakh Crore
 21-Year Tax Holiday Clears The Path For India’s GCC Boom, Where's The Big Opportunities?
 India–US Trade Deal Sparks Massive Market Rally | Amit Goel Explains
 India–US Trade Deal After Tariff War: Trump Slashes Tariffs, Modi Welcomes Trade Reset
 India-US Deal: Not A Blanket Cut, But A Big Boost | Fine Print Matters
 Bajaj Housing shares up 2% after Q3 results: What lies ahead for investors?
 IREDA shares climb 2%, snapping 4-session fall; trend still cautious or reversal sign?
 Sensex, Nifty roar back with 2.5% surge as India-US trade deal brightens outlook for markets, rupee
 Solar Industries Q3 earnings: Defence firm logs highest revenue, EBITDA; stock ends higher
  Adani Enterprises Q3 earnings: Net profit surges 97 times; stock zooms 12%